Fried Dumplings Recipe

Fried Dumplings Recipe

I’ve officially started my maternity leave as of this weekend and I’m now 32 weeks pregnant. Millie (my unborn daughter’s name is Amelia) is very healthy and very active. As confirmed by one of my many midwives (we don’t get a permanent midwife here in Edinburgh) an active baby is a healthy baby and Millie is very active!

I think I’ve been quite lucky my with pregnancy so far as she tends to move around a lot during the day but less so during the night, let’s hope she stays like this when she’s born!. I’ve heard of a lot of pregnant women complaining about babies kicking them and they can’t get enough sleep but “so far” I’ve been lucky.

People have been asking me what it feels like to have a baby move around my belly and the best way I can describe it is it feels like a flower blossoming, albeit a strong one. I can feel her waving her arms and legs and if you can imagine it really does look/feel like a flower blossoming.

Any discomfort at this stage of my pregnancy? Yes! Recently I’ve been suffering from constant heart burn but I’ve learnt how to control it. Soy milk and ginger tea have been really helping me. Apart from that everything is good but I’m really confident that years of working as a chef have made me fairly strong and really fit so even though my belly has grown considerate, everything else; my bum/arms etc, are still fairly normal.

So this is my first recipe in a really long time (sorry!) and I decided to share with you a recipe for “Fried Dumplings” which I also cooked for my colleagues during my last two shifts. I promised them a really long time ago that I would bring in dumplings and finally I did.

If you follow my blog you will know I have cooked dumplings before. This time I changed the recipe a little bit for the filling and the cooking method is different compared with the older dumpling recipes.

Please find the recipe for the dumplings I made previously here: Dumplings Shui Jiao

The reason I changed the ingredients from Chinese chive to spring onion is Chinese chive has, during my pregnancy, made me feel quite ill. On the couple occasions I have eaten it I have felt really bloated so I replaced it. I also added some chopped fried eggs into the filling as it improves the texture but most importantly gives it a stronger flavour.

About changing the method of cooking, last time I boiled the dumplings, which I of course had to do again but I finished the dumplings off by frying them. When I lived with my parents my mother would fry left over dumplings from the previous night’s meal and turn them into a really delicious snack. In effect it gives the dumplings a new life!

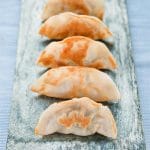
Dumplings are fantastic as both a snack and a meal. Whether you fry or just boil them, they are really quick to make (we made around 140 dumplings and it took us about 1 hour although we are really quick nowadays at making them), they’re extremely healthy and they’re filling. Here is one recipe that I often use to make Fried Dumplings.

fried dumplings
fried dumplings


Fried Dumplings Recipe

Course Main Dish
Prep Time 1 hour
Cook Time 15 minutes
Total Time 1 hour 15 minutes
Servings 120 dumplings

Ingredients

Ingredients

  • 1 kg pork mince
  • 2 bunches spring onions chop finely
  • 3 slices ginger chop finely
  • 6 large eggs beat and season with 1 tsp soy sauce, 1/2 tsp salt and 1 tsp sugar
  • 1 tbsp dried shrimp soften in hot water and chop finely (available in most Chinese supermarkets)

Seasonings

  • 1 cup light soy sauce
  • 1 tsp salt
  • 1 tbsp sugar
  • 1 tbsp sesame oil

Instructions

  1. Fry the eggs as thin as a crepe and chop it finely when it has cooled down
  2. Mix all the ingredients and seasonings evenly and leave it for 30 minutes
  3. Make the dumplings as the procedure photos from the link above shows. You can use a little bit of water to help the edge of the dumpling pastries to stick together
  4. Boil a big pot of water and cook dumplings in the boiling water
  5. When the dumplings have risen and are floating on top of the water, they are cooked (please note this applies to fresh dumplings only, if they are frozen you will need to wait for the water to boil then add more water. Wait to boil again, repeat twice, then they are cooked)
  6. Cool the dumplings down under cold water and drain. Gently mix some oil with the dumplings to prevent them from sticking together.
  7. Heat up a little bit of oil in the frying pan and fry the dumplings until they are golden brown on the outside. They are ready to serve!


Lion Head Meatballs

Lion Head Meatballs

lion head meatballs

(獅子頭) Lion head is a famous dish in Chinese cuisine. It originates from Eastern China and the history of this dish goes back to the Sui Dynasty.

Emperor Yang of Sui brought his queens had take a boat trip to south east China. He especially loved the landscape and views of Yangzhou. So, afterwards he went back to his palace and gave his chefs four cooking subjects which were inspirited from landscapes of Yangzhou. Lion head was one of the dishes been created but back at that time Lion head is not known as Lion head. It wasn’t until the Tang Dynasty that the name changed to Lion head because it looks like a male lion’s head.

You will find out the meat balls really look like a Chinese guardian lions head if you have ever seen the pictures. Well, now you know when Chinese people talking about “ hey, let’s have lion head tonight for dinner “ it doesn’t mean real “Lion’s head”, it’s just Chinese style of meatball. I always remember when I told my Italian friend that I’m going to cook him “Lion head” and his jaw nearly dropped to the floor with a terrified look. Until now, this memory still makes us laugh all the time.

Here is the recipe for Lion head meatballs:


Lion Head Meatballs

Course Main Dish
Prep Time 30 minutes
Cook Time 1 hour
Total Time 1 hour 30 minutes
Servings 2 people

Ingredients

Lion Head Meatball's Ingredients

  • 50 g pork mince
  • 300 g pork belly without skin
  • 2 spring onions chop really finely
  • 10 g ginger chop really finely
  • 1 large egg
  • 50 g tofu

Seasonings for Meatballs

  • 1 tbsp light soy sauce
  • 1 tsp salt
  • 1 pinch white pepper powder
  • 1 tbsp sesame oil
  • 1/2 tsp sugar
  • 1 tsp potato starch

Ingredients for soup

  • 1/2 medium Chinese leaf medium size leaf quartered lengthways
  • 3 bunches glass noodles soak in warm water until soft
  • 2 spring onions cut 3cm lengthways
  • 1 leek
  • 4 cloves garlic
  • 2 thin slices ginger
  • 1 star anise
  • 1 small piece cinnamon
  • 200 g tofu place into a container and cover in the water. Frozen it for a few hours until it has small honeycomb ish holds. After it defrost a little bit and slice it to 2 cm thick squire shape. (This is optional. “frozen tofu” is very popular in Taiwan because I had lots tofu left over from make mixture of lion head so I deicide to cook with it.)

Seasonings for soup

  • 2 tbsp soy sauce
  • 1 tsp salt
  • water or stock
  • 1 tbsp Shaoxing rice wine
  • 1/2 tsp sugar

Instructions

Lion Head Meatballs Procedure

  1. Cut the pork belly into small dice and use blender to blend it into really finely mince.
  2. Mix all the ingredients and seasonings together and start throwing down the meatballs mixture a few times. This is for pursuing the better texture and taste of meatballs. It’s also a fantastic way to release your anger.
  3. With damp hands, take a large mound of the minced meat mixture and mould into a ball. Place on a plate and repeat with the remaining meatball mixture.
  4. Heat up a deep pan with oil for fry the meatballs or use a frying pay with more than 1cm high of oil to fry the meatballs. This is help the meatballs to settle the shape and enhance the colour of it. After just leave meatballs on aside.

Soup Procedure

  1. Use a frying pan to sauté ginger, garlic, spring onion and leek until it turned a little bit soft.
  2. Add star anise and cinnamon to sauté with.
  3. Place procedures 2 and meatballs we made earlier into a stock pot or a casserole dish.
  4. Add all the seasonings into the pot and use water or stock to cover the meatballs.
  5. Use full strength power to boil it then turn to lowest fire to simmer it for 30~45 minutes and then put Chinese leaf, frozen tofu into the pot to cook for another 15~20 minutes until it’s soft.
  6. Add glass noodle at the end to cook with the meatballs as glass noodles will absorb a lot of soup. After the glass noodles soften add the lion head meatballs. Then of course you can eat.

Recipe Notes

You can also blanch some bok choy for garnish.


Taiwanese Home Made Noodle Salad Recipe

Taiwanese Home Made Noodle Salad Recipe

We often eat this Taiwanese home made noodle salad during the summer but as I’m pregnant this year and I feel my body temperature is quite high, I’ve been really craving this dish. I believe a lot of pregnant ladies can understand how I feel when their bodies are growing and you feel really quite hot. Normally in Scotland I’m absolutely freezing but even with the recent temperature drop I’m feeling comfortable.

So now rather than me chattering I’m enjoying watching my husband and my cat chatter instead.

My good friend Lorenzo, remember the Italian guy I used to live with, once asked me if it’s difficult to make good noodles at home. Without a pasta machine it’s very difficult but with a pasta machine it’s just so much easier and so much more consistent. With this in mind we popped out to a local Italian patisserie that we go to and bought a really fantastic little pasta machine.

Taiwanese home made noodle salad is great for pregnant woman but also really good for people trying to lose weight as the ingredients are very light and fresh. There’s no frying here and in the case of the chicken I steamed it. I also made a sesame sauce which is really delicious.

taiwanese home made noodle salad
lye water
how to make noodles at home


Taiwanese Home Made Noodle Salad Recipe

Course Main Dish
Prep Time 1 hour
Cook Time 15 minutes
Total Time 1 hour 15 minutes
Servings 3 people

Ingredients

Ingredients for noodles

  • 350 g water
  • 1 tsp salt
  • 850 g bread flour
  • Lye water lye water is like bicarbonate of soda in a bottle

Ingredients for salad

  • 1 cucumber julienne it
  • 1 small carrot julienne it
  • 2 chicken breasts
  • 2 large eggs

Ingredients for sesame dressing

  • 150 g toasted white sesame
  • 1/2 cup water
  • 1 tbsp sunflower oil
  • 1 tsp salt
  • 1 tsp vinegar
  • 2 cloves garlic
  • 2 tbsp soy sauce
  • 1 tsp sugar

Instructions

Procedure for noodles

  1. Mix all of the ingredients for the noodles together in a large mixing bowl. Kneed the dough until it’s loose and even.
  2. Flatten the dough as per the fourth preparation below and cut into even amounts.
  3. Roll each load of dough until it’s thin enough to fit through the pasta machine (approximately 1cm thick).
  4. Use the pasta machine to flatten the mixture. Repeat this process several times and each time make the rollers in the machine closer. In the case of the machine I used I set it at the end to setting number 4 (1 being the thickest, 9 being the thinnest).
  5. After the dough has been flattened feed the mixture through the rollers that cut the dough on the other end. Cover the noodles with flour and set aside.
  6. When you’re ready to cook the noodles, boil a pan of water and cook the noodles for approximately 2-3 minutes. After they are cooked cool the noodles down with cold water and then drain the water. Cover the noodles with a little cooking oil (sesame/sunflower etc) to stop the noodles sticking together).

Procedure for salad

  1. Julienne the cucumber and carrot.
  2. Season the chicken breast with salt and pepper. Roll the chicken breast in some cling film and steam the chicken breast until it has cooked.
  3. After it has cooked remove the cling film, allow it to cool down and then julienne the chicken.
  4. Beat the eggs, mix with the soy sauce and a little white pepper powder. Heat up a frying pan and make a crepe-thin fried egg. After the egg has cooled julienne it.

Procedure for sesame dressing

  1. Toast the white sesame in a frying pan. Use a food processor or smoothie machine to puree the white sesame with 1 tablespoon of sunflower oil.
  2. Add all of the ingredients into the machine and continue to mix everything together until there are no lumps. Taste the sauce before service. You can adjust the seasoning yourself to suit personal preference. I like the dressing quite strong but adjust the amounts of salt and soy sauce to suit.


Holyrood 9A Restaurant Review

Most people think of junk food as things like KFC, curries, chinese takeaway and burgers but I had a real craving (pregnant ladies will understand this!) for burgers one day and we were recommended to go to this fabulous little bar, Holyrood 9A, in Edinburgh that sells a variety of burgers, sandwiches, steaks and more. Ok I know burgers sound like junk food but the burgers here are actually really good and not your typical greasy burger.

We ordered two burgers, a Pioneer Burger (for Chris) and I ordered a Chicken Italienne Burger. As you can see from the photos they have really fresh bread and put a LOT of fresh vegetables in the burgers. My burger especially had lean but juicy chicken breast, baby gem lettuce, rocket and fresh tomatoes.

Everything is beatifully cooked, the price is really fair and their chips are awesome (really crunchy). The tastiest thing though (another hunger craving) is the garlic mayonnaise. I also really liked the service there. I asked if the cheese and mayo were prepared with unpasteurised ingredients (milk/eggs) and the service lady checked this for me. Hollyrood 9A in conclusion is fairly cheap, the food is absolutely delicious and it really cured that day’s pregnancy craving. Excellent!

The Pioneer Burger

6oz burger, sauteed rosemary scented wild mushrooms
Crispy bacon
Swiss cheese
Garlic Mayo
Crunch chips

Chicken Italienne Burger

Grilled chicken breast
Argula
Sun Blazed Tomato
Buffalo Mozzarella
Pesto Mayo
Baby Gem Lettuce
Rocket
Crunch Chips

In total we spent £26 and that included two really large burgers, crunchy chips and four drinks; 1 milkshake (which was really good), 1 coke and 2 sprites.

Check out Holyrood 9A restaurant here

Find Holyrood 9A here

Smoked Haddock and Prawn Fried Rice

Smoked Haddock and Prawn Fried Rice

So I’m now 16 weeks pregnant now! One of the main things I have learnt about pregnancy, at least for myself, is one has to eat really healthy. I’m finally getting over morning sickness and I don’t really have any hunger cravings but I’ve found if I eat unhealthily (ie if I eat a curry or deep fried food) then my morning sickness comes back.

With this in mind I’ve changed my diet quite a lot recently. I still enjoy some junk food sometimes (for example a curry / kfc etc) but my body can only handle food like this once in a blue moon. Maybe it’s my baby being demanding but my morning sickness is best controlled when I eat home made fresh food. Recently Chris and I have been eating a lot of seafood and we’re fortunate in Edinburgh to have a really great fishmonger called Eddie’s Seafood. It’s a Hong Kongnese run fishmonger in Marchmont so it’s really nice for me to pop in and have a chat in Chinese but most importantly they sell really gorgeous fresh seafood at excellent prices and a large variety of fish.

Another issue I have, and this is one of the reason I’ve been struggling to update my blog, is I’ve been really busy. I’m studying at college full time, working part time, suffering from morning sickness as well as back ache so I really have to cook quick but really healthy food and fried rice for me is an obvious choice.

This isn’t to say I won’t cook other things but right now fried rice hits the spot perfectly and today I had a craving for a smoked haddock and prawn fried rice

I’m going to try to update this blog more regularly than I have been in the last couple of months and certainly when I go on maternity leave next year I’ll do a lot more cooking (I plan to cook most if not all of my babies food so I’ll be cooking like crazy).

Also a bit more personal, I had my 16 week midwife’s appointment Tuesday this week. We were the first couple to arrive and very annoyingly had to wait for two couples who were booked after me to be seen first as they needed translators (next time I might demand a Chinese translator out of spite) and we heard the baby’s heartbeat. Just like the scan this was really amazing. Our baby’s heart rate was 150bpm and we heard it kick, so awesome!

It looks like we’re going to have a really healthy baby to bring home next year, exciting times!

Hope you like this recipe for smoked haddock and prawn fried rice.

smoked haddock and prawn fried rice


Smoked Haddock and Prawn Fried Rice

Course Main Dish
Prep Time 45 minutes
Total Time 45 minutes
Servings 3 people

Ingredients

  • 1 smoked haddock fillet
  • 200 g raw king prawns
  • 3 large eggs
  • 2 spring onions finely chopped
  • 1 medium carrot
  • 1 can sweetcorn
  • 1 handful peas
  • 2 cloves garlic
  • 1 shallot finely chopped
  • 1 tsp rice wine
  • 2 tbsp soy sauce
  • 3 bowls cooked rice
  • Salt and pepper to taste

Instructions

  1. Cut the smoked haddock into small dices and heat up a wok with one tablespoon of oil. Stir fry the garlic and shallot first and then fry the smoked haddock together with the garlic and shallot. After putting the smoked haddock in the wok add the rice wine and cook together. Once the smoked haddock is cooked leave it aside for later.
  2. Clean the wok and heat up again with a little bit of oil. Fry the prawns and add a little salt and pepper to season it. Once the prawn is cooked (changed colour) leave aside just like the haddock in step one.
  3. Boil some water in a pan and cook the carrots first then add the peas and cook. Once cooked drain the water and add the sweetcorn (sweetcorn doesn’t need cooking).
  4. Beat the eggs and heat up a wok with 2 tablespoons of oil. Fry the eggs first and put the cold rice in the wok and mix them together. Keep mixing together and make sure there are no lumps in the rice.
  5. Add step 1 and spring onions and mix them evenly with the last step. After that mix everything else together evenly and use soy sauce, salt and pepper to season the fried rice to taste. It’s now ready to serve.