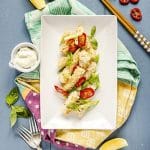
Simple Chinese Garlic Chicken with Quinoa Salad
Here are some of the health benefits of quinoa:
- Quinoa is a nutritious dense grain.
- Quinoa is gluten-free
- Quinoa contains high levels of protein and is one of a few plants to do so
- Consuming Quinoa regularly can help your body to reduce the risk of inflammation
- Quinoa is also high in fibre so it can also help your body to maintain healthy levels of blood sugar
- Consuming Quinoa in your diet regularly can also help your body reduce the risk of allergies
- Lower your cholesterol and help maintain HDL cholesterol level.
Quinoa is also high in iron, B-vitamins, magnesium, phosphorus, potassium, calcium and Vitamin E. So it’s no wonder people often called quinoa a superfood.
Before writing this blog post I had never eaten or cooked quinoa before so to be honest I just followed the instructions from the packaging on how to cook. Turns out it’s a really easy thing to cook.
I just love the texture of quinoa. i think it tastes better than cous cous and if you like your quinoa quite soft then you can add a bit more water to cook but if you like it a little al-dente then reduce the amount of the water you use to cook it.
Quinoa is not a typical food in Chinese cooking so I will say this dish is a bit like Chinese meats Western type of food. I use the marinade in this post for chicken legs really often and you can use the marinade with pretty much any kind of meat. You can also coat the meat with some flour, beaten eggs and breadcrumbs to deep-fry the chicken after marinading. You can also roast it in the oven and either way will taste really good. If you’re not a fan of chicken legs then you can use chicken breast instead.
What I will often do to save time and hassle is buy a few chicken legs or chicken breasts, depending on what I fancy, and marinade in this way then separate into smallish portions. I’ll bag them in a freezer bag, free them and that’s dinner sorted out for at least a couple meals.
This is an ideal week day dinner or lunch for any household.

Ingredients

How to Debone a Chicken


Simple Chinese Garlic Chicken with Quinoa Salad
Ingredients
Ingredients
- 1 chicken de-boned, including thigh and drumstick
- 100 g white quinoa
- 500 ml boiling water for cooking the quinoa
- 100 g cucumber cut into half then slice 0.5cm thick
- 8 cherry tomatoes cut into half
- Coriander and mint finely chop
Marinade for Chicken legs
- 1 tbsp light soy sauce
- 1 tsp dark soy sauce
- 1/2 tbsp sugar
- 1/2 tsp salt
- 1 clove garlic finely chopped
- 1/4 tsp coarse black pepper
Seasonings for Quinoa Salad
- 1/2 tsp salt
- 1 lime zest and juice
- 1/2 tsp demerara sugar
- 1 tbsp cooking oil
Instructions
-
De-bone the chicken legs and marinade with all the seasonings from the light soy sauce to coarse black pepper for at least 30 minutes. I would recommend you marinade overnight if you can as everything will taste much better.
-
Follow the instructions on the packaging of the quinoa. I rinsed the quinoa under cold water a few times to wash away the bitterness of the quinoa.
-
I soaked the quinoa in cold water for five minutes and drained the water completely. Put boiling water and quinoa in a saucepan and bring it to a boil first. Then turn to lowest heat, simmer and cover the quinoa until the water is nearly dry and the quinoa is tender. Then it’s ready (this will take around 15-20 minutes).
-
Use a fork to loosen up the quinoa and mix with all the seasonings from salt to olive oil. Then leave aside to cool down.
-
Pre-heat an oven to 200c.
-
Heat up some oil in frying pan or skillet. Place the chicken legs skin side down and fry each side for 2 minutes then put in the oven and roast for 10 minutes.
-
Use the remaining oil in the frying pan to quickly fry cucumber and cherry tomatoes for 20 seconds.
-
Mix step 6 cherry tomatoes, cucumber, chopped coriander and mint with the quinoa.
-
Let the chicken legs cool down a little bit then slice and serve with some quinoa salad.
-
You can garnish this dish with some chopped coriander, mint and some lime.